During a mission, the images are saved to the MicroSD card inside the drone.
First, take the MicroSD card out of the drone and insert it into your card reader on your computer.
The slot location is different between the drone models:
Air 2S: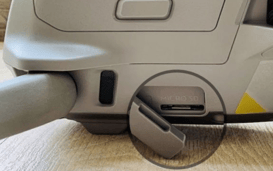
Mavic 2 Pro: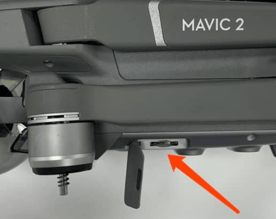
Phantom 4 Pro: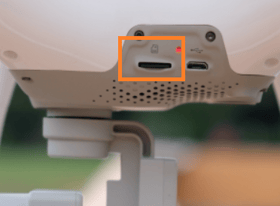
Push the card once to pop it out of the slot.
On your computer, the SD card will show up as a new drive in "My Computer".
Open the drive of the SD card and enter the DCIM folder.
Here you will see folders named 100MEDIA, 101MEDIA, 102MEDIA, etc.
These folders contain the images.
* There's a maximum of 999 images for each folder. If there are more images, a new folder will be created.
Make sure your computer has a stable internet connection, open the AgroScout Web Platform and you can start uploading the images:
Uploading images to the web platform tutorial
• Depending on the number of images you have, the upload process can take a while.
If you want to keep using the Micro SD card when uploading, cut and paste the MEDIA folders to a different location on your computer (i.e desktop).
• After a successful upload, make sure all images are can be viewed on the web platform and then you can delete the MEDIA folders from the SD card of the drone.