Drone does not take off
Before creating a mission or opening an existing one, make sure the drone is connected to the app, the connection status is shown on the main screen.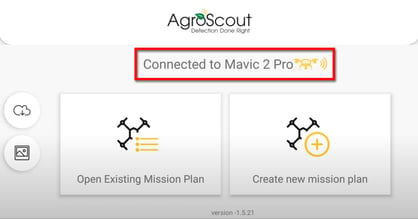
If the drone is connected and still does not take off, open the DJI GO 4 app and check the status of the drone in the upper left corner of the main screen.
If it says "Can't take off" click it and follow DJI's instructions on how to fix it.
The most common reasons are: Battery not fully inserted into the drone or that you are in a restricted flight area.
If you can't get the drone to connect to the app please check:
Troubleshoot Android connection issues
Not enough space on the SD card error
Sometimes it appears even when we have enough space in the SD memory, but there is another problem that may be related to storage access.
Possible solutions:
1. Reboot the system:
If you had a good satisfying flight the last time, and you didn't change any settings, usually a system reset will fix the damage.
Exit the sky app, turn off the drone, remote control and tablet. Then turn them all back on again and try to do the mission again.
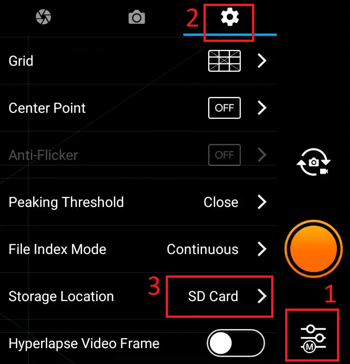
2. Make sure the storage unit is the SD card.
Please check this point using the DJI GO 4 app and change it if necessary.
3. Corrupted SD card.
If changing the storage drive doesn't fix the problem, then it may be an SD card problem.
You can try formatting the SD card using the DJI GO app or use a different SD card.
Drone shakes while flying
This problem can occur when there are strong magnetic interference forces or weak GPS signals. To fix it, make sure you are away from any metal objects, antennas, and power cables, and re-calibrate the compass. Then, restart the drone, remote control, tablet and try again.
Sample image is not received
When the drone reaches the first point of the polygon it will take the first sample image and send it back to the device. It should take a few seconds.
If there is a weak connection between the drone and the controller, it may take longer or the photo may not arrive. If you don't have the photo after 5-10 seconds you can try the following:
1. Improve the connection with the drone. Make sure there is a good line of sight between the drone and the controller. The antennas should be facing the drone for optimal connection. There should be no obstacles between the drone and the remote controller.

2. Try to get a new sample photo. Press the capture button again to take a sample photo again.
3. If you still can't get the sample image, try another mission with a closest starting point to your location.
Wrong gimbal angle
Sometimes the gimbal camera does not rotate towards the ground and remains horizontal during the mission, this can be due to one of these reasons:
1. The ground at takeoff is not level.
2. Drone is turned on when it is still in hand.
3. Something gets in the way when the camera is adjusting and prevents the drone from stabilizing normally. (We highly recommend using a landing pad)
If this happens you should see it when the drone sends you the sample image.
If you see that the image shown is not at the correct gimbal angle, please do one of the following:
1. Land the drone, turn it off, and turn it on again making sure it is on a level surface.
2. While viewing the sample image, turn the left wheel on the remote controller all the way to the left for about 7 seconds. This will turn the gimbal down to the ground. After doing that, take a new image to see if it looks good now and if so start the flight by tapping the play button.
If the sample image doesn't look good - don't start the mission because all the images of the flight will look the same.
Wrong height issue
If the drone does not descend to the desired height when it reaches the first point of the polygon and the image shows that you receive it is higher than it should, you can fix it with this method:
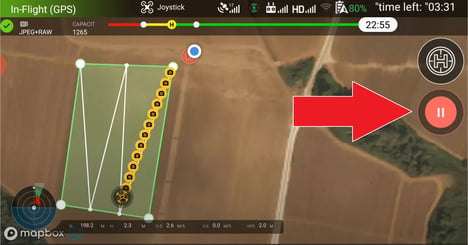
1. Start the mission as normal. If the drone doesn't keep the right height, click the pause button.
Después de presionar el botón de pausa, el dron permanecerá detenido y podrás tener control manual.
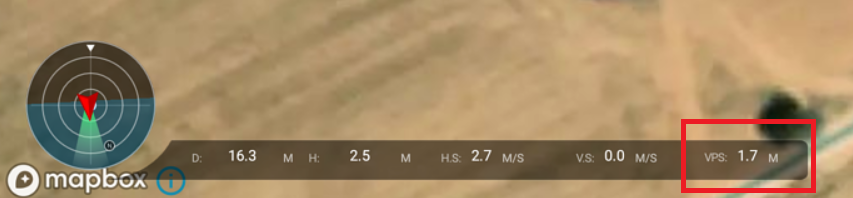
2. Take the left stick of the remote control down to lower the drone to the correct height.
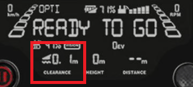
Use the VPS height displayed at the bottom of the screen to see the current height of the drone as it descends. (You can also use the CLEARANCE value on the remote control display.)
After the drone is at the correct height, resume the mission by clicking the play button. The drone should now continue to fly at the corrected height.